How to Screen Record on macOS (All Versions)?
If you want to screen record on macOS then here is how to do it. The method is applicable on all macOS despite their versions. You are going to use the method to screen record with built-in and third-party applications. While there won’t be any sort of error to perform the task, permission popups might be the only issue that concerns you. For users who have experienced permission popups, they are going to down at the bottom to fix that.
How to Screen Record on macOS?

We are going to check built-in options to screen record on macOS. Then we will use third-party applications for this purpose. While built-in options can only record your screen, a third party also has the option to edit them. No matter which one you will use, you can use them across all platforms.
NOTE: this method is applicable on all versions of macOS. Form macOS Mojave, macOS Catalina, macOS Big Sur, macOS Monterey to macOS Ventura, all of them have the same steps.
Record video with built-in tools
Inside the macOS, you will find the Screenshot tool and QuickTime Player that can take screenshots and record screens. First, we will use the dedicated tool then we will also try QuickTime Player.
Screenshot tool
Use the Command+Shift+5 keys as shortcut keys to open the tool. Users who are using macOS High Sierra will use the Command+Shift+4 keys.

The Screenshot toolbar will appear on your screen. Here you will find different icons for different purposes.
- You can use Record the entire screen to screen record the whole screen
- Record a portion of the screen will be used to record partial part of your screen

Click on the icons of recording on the Screenshot toolbar and then click on the Record button.

TIP: you will find the Options button in the Screenshot toolbar. Here you will click on it and you will find different options. You can select Timer, Save to location, and even Microphone options.

Once you have recorded, then you are going to click on the stop icon at the top of your screen.
QuickTime Player
Users who want to use QuickTime Player for recording their screen will need to open the app. Then they will navigate through the File > New Screen Recording option. From here on, you are going to record your screen.
Use Third-party tools
You will find tons of tools for this purpose. There are also tools that will do the work for free and there are premium tools. Compared to built-in tools, you will find third-party tools stocked with advanced tools to edit or share recorded videos.
NOTE: we don’t have any sort of affiliation in any sort with the products given.
Movavi Screen Recorder is the first recommended tool for you to screen record things on macOS. The tool is totally free of cost and is quite easy to use. You won’t face any sort of issue while using it, thanks to its easy interface.
The tools are fast, stable, and can do things like streaming. Other than streaming, you can also attend to host webinars or online calls using Movavi Screen Recorder.
You might find Screen Capture an interesting alternative to Movavi. Screen Capture is a premium tool to screen record. The tool is fast with an amazingly simple but astonishing interface.
There will be no need for any sort of installation to use Screen Capture. Nor you will find any pre-recording settings. Directly use the app on your macOS. The only thing that might stop you from using the application will be the cost of the app.
Unlike Movavi or other applications below, you won’t find Screen Capture free. The application is premium and needs to be purchased. Else, you will find a limited number of features with watermarks on your videos with a trial version.
And at last, you are recommended to use VLC to record screens on macOS. VLC is a popular media player and is open-source. You can download it from the internet for free.
Screen Recording Permission on macOS
Users who are using macOS (mostly macOS Catalina) will experience the popup window asking for screen recording permission. This is due to DisplayLinked always using drivers to enable pixels on the screen and to use an extended screen or render mirror of your screen.
In simple words, you won’t be able to screen record without enabling this. And here is to do it.
You will find a pop-up on your screen with;
“DisplayLink Manager” would like to record this computer’s screen
Now you are going to click on System Preferences.

In System Preferences, you are going to select Security & Privacy option.

Here you are going to find and select Screen Recording. And at the bottom left, you will find a Lock icon. Click on the icon and DisplayLink Manager will appear on the right pane.

Check the box beside the DisplayLink Manager.
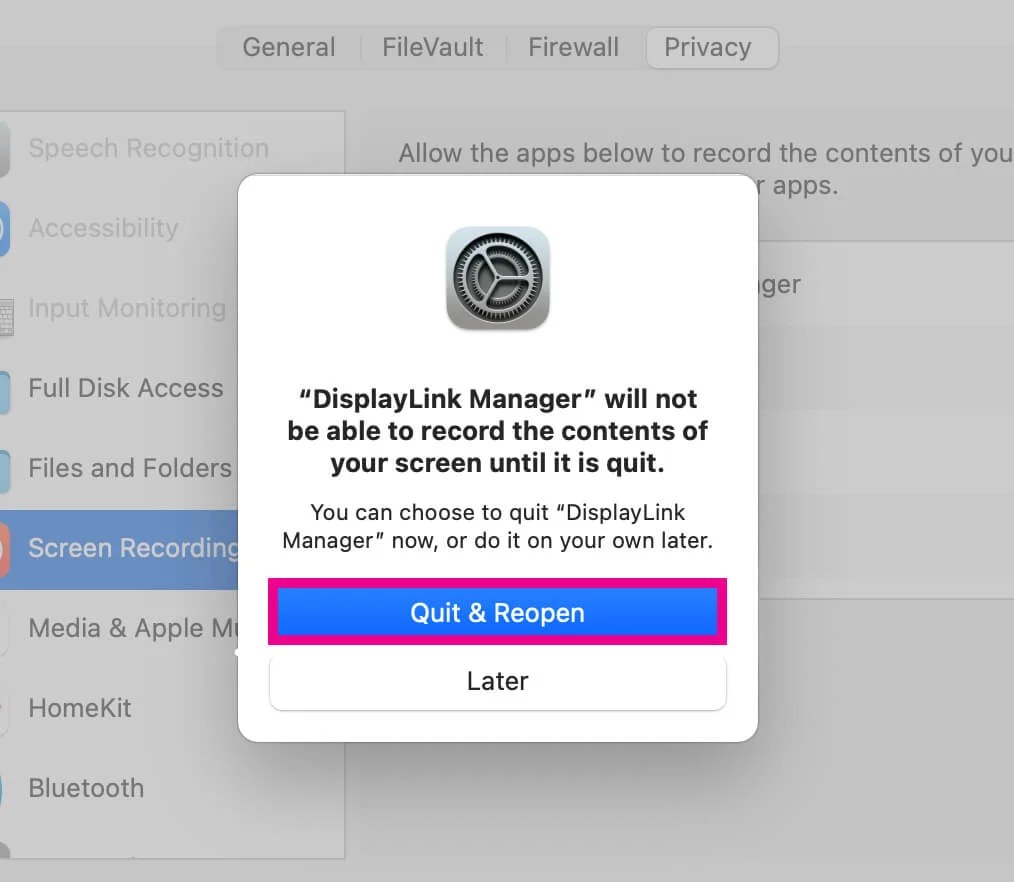
A Popup window will appear and you will click on Quite & Reopen. Now click on the Lock icon again, Save the changes and do the screen recording.
How to exit macOS screen recording?
If you are recording the screen on macOS using the built-in tool then you are going to click on the stop icon at the top right of your screen. Else users who are using third-party applications will open the minimized window and then click on the stop icon.


