Ultimate Guide: Fix macOS Mojave Screen Resolution VMware
MacOS virtualization creates a virtual instance of the macOS operating system within a virtual machine. It’s useful for testing applications and running multiple operating systems on a single physical computer. However; issues have been experienced after installing macOS Mojave on VMware.
One of the most common ones is having screen resolution issues. And here we are going to fix the macOS Mojave screen resolution on VMware.
The most used Virtual Machine for macOS Mojave is either VMware or VirtualBox. And in VMware, it’s either VMware Workstation Pro or VMware Player. So, without wasting a single moment let’s fix the macOS 10.14 Mojave screen resolution on VMware Workstation.
How to Fix macOS Mojave Screen Resolution on VMware?
The very first step which every user must do in order to fix the resolution is to install VMware Tools. If none of them worked, I will provide you with a set of codes that will certainly Fix macOS Mojave Screen Resolution.
Before we dive into fixing the screen resolution on macOS Mojave, let me give you a heads-up. If you’re using VMware Workstation 15 or an older version, you’ll need to download the darwin.iso file from the link below to get started.
Download Darwin.ISO file for VMware
Darwin, also known as VMware Tools, is your go-to solution for fixing the screen resolution on macOS guest OS (inside VM). Darwin enables you to copy and paste files between your host and virtual machine. After the installation and configuration of Darwin, your screen resolution will be fixed, and you’ll be able to use the clipboard seamlessly. In short, Darwin is an essential tool that you’ll need to get your macOS guest operating system up and running smoothly on VMware.
Repairing Screen Resolution Error

To get your screen resolution back on track and running smoothly, here are the steps you can follow to fix the macOS Mojave screen resolution error.
Download VMware Tools
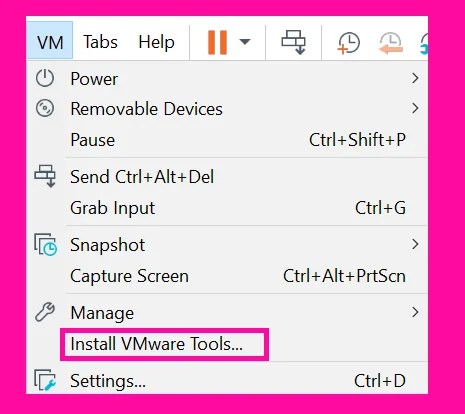
Click on the VM menu> Install VMware tools. In case the Install VMware tools didn’t work, then you can also download darwin from the given link above. Then visit VM menu> Settings> CD/DVD (SATA), select Use ISO File, and locate the darwin.iso
Install VMware Tools
Once you select the Install VMware tool or manually added Darwin.iso, the Installation of VMware window will appear on your screen. So, simply click Install VMware Tools.
- VMware Tools wizard will appear. Click Continue in the Welcome wizard.
- Select the destination and click on Continue again.
- Once you have reached the Installation type window, simply click Install.
- Now you have to enter your login password in order to install the VMware tools.
After a few seconds, the installation process will take place. A security pop-up will appear which will ask you to allow the installation of non-downloaded apps from the Apps Store.
Unlock Open Security Preferences

Open Security Preferences then click on Allow. Enter your password again. Allow nonapplications and the installation of VMware Tools will end. And now it is time for you to Restart the Virtual machine.
Restart Virtual Machine
After the restart, you will find everything fixed. By any chance, if the issue persists then you will reinstall the VMware tools. If the re-installation did not respond, follow the below procedure to fix the error.
Issue Persists after the installation of VMware tools
Open Spotlight by pressing the Windows+Space keys. Or click on the search icon on the menu and the spotlight will open. Once the Spotlight is opened Search for Terminal and open it. Paste the command on the terminal:
sudo defaults write /Library/Preferences/com.apple.windowsserver DisplayResolutionEnabled -bool NOAfter the command, you will be asked to insert your password. Confirm your command by inserting your password and the changes will be made.
Restart the virtual machine again. If the error is fixed then congrats, else you are going to use this one to fix the screen resolution error. Open the terminal again and use the command below:
sudo defaults delete/Library/Preferences/com.apple.windowserver.plist DisplayResolutionEnabledThis will fix the error for sure. Still, by any chance, if you got the problem persistent enough then you are recommended to comment down. I will personally guide you to fix the issue.
Related: How to Fix macOS Screen Resolution After OS Installation?
Related: How to Fix macOS Monterey Stuck Black Screen?
Related: How to Install VMware Tools on Linux?


