How to Install Windows 11 on VirtualBox?
In June of 2021 Windows 11 was released as the successor of Windows 10. For those who want to check their project for system compatibility or want to check out Windows 11 then Virtual Box is a great option. Here using this practice, you will install Windows 11 on VirtualBox.
Before we continue, in Windows 11 system requirement there is a need for a TPM system type. So, will this affect the installation of VirtualBox as without TPM most of the systems were unable to run Windows 11 at all?
TPM on VirtualBox for Windows 11

TPM (trusted platform module) is an international standard dedicated microcontroller designed to secure hardware through integrated cryptographic keys. Know more here.
Thanks to new updates from Oracles on VirtualBox, with the Virtual TPM emulation feature you can easily install Windows 11 on VB. Any VirtualBox version 7 or above has the Virtual TPM emulation feature that enables you to do the installation even on a system with TPM.
Requirement
For running Windows 11, you will need at least 8GB of RAM. 4GB has been suggested too, however; it will only ruin the experience due to poor performance and lagging screen. Instead, use 8GB or even 16GB if possible for a smooth experience.
A total of 500GB storage for running both host OS and guest OS with the processor of Intel Core i3 or better is also required.
Prerequisites
Download VirtualBox: desktop users can download VirtualBox here, whereas users on Linux; can use their terminal to download the app. Run the Terminal application and type “Sudo apt install VirtualBox”.
The command will start downloading the setup file and then the installation will start too.
Download Windows 11 ISO file: it will be later used for installing on VirtualBox.
How to Install Windows 11 on VirtualBox?

Here is how to do it:
Create VM for Windows 11
Run VirtualBox on your system and click on the New in the menu bar at the top.
Then you will need to name the virtual machine and specify the details too.
- Name: Windows 11 (you can use any name)
- Machine Folder: C:\Users\itechscreen\orcale (the location can vary, according to your system)
- Type: Microsoft Windows
- Version: Windows 10 (64-bit)
Once all the details have been specified then you will need to click on Next.

Here you will need to specify the RAM too. Drag the slide bar to increase or decrease the RAM memory size. Specify how much you are going to provide to RAM and click on Next.

You will be taken to the Hard disk window. In the Hard disk window, you will need to create a new virtual hard disk, for virtual hard disk there will be three options:
- Do not add a virtual hard disk
- Create a virtual hard disk now
- Use an existing virtual hard disk file
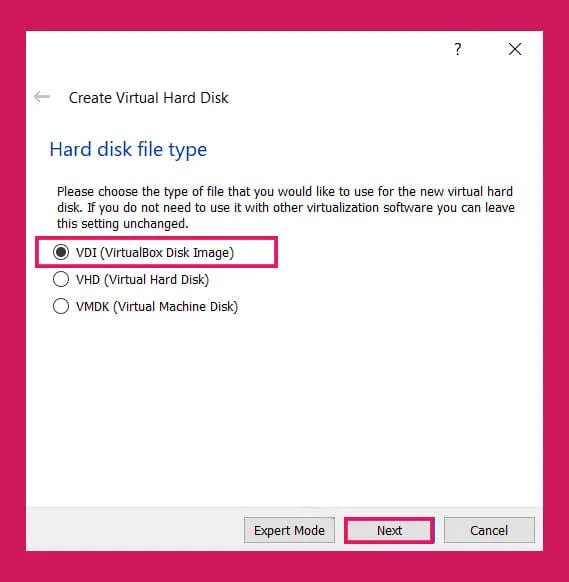
Select the second option and click on Create. Then you will need to select the type of Virtual Disk in the Hard disk type window.
- VDI (virtualbox disk image)
- VHD (virtual hard disk)
- VMDK (virtual machine disk)
The first option “VDI (VirtualBox Disk Image)” will be the option for you.

VirtualBox will move you to Storage on a Physical hard disk window. Out of:
- Dynamically allocated
- Fixed size
Select the first (Dynamically allocated) option.

In the File location and size location of the new VM, click on the file icon and select the name and location of your new virtual machine. Once the location is selected, specify the storage amount by dragging the storage bar and click on Create.
Select the ISO file
If have completed the steps above then, it means you have successfully created a virtual machine for your Windows 11. Now, we will need to select the ISO file and then will boot Windows 11.
Select the VM of Windows 11 which is on the right side of your window, then you will find a Setting icon on the right side; click on it.
Inside the Settings, you will need to navigate to Storage and there you will find the Storage Devices section. Below that you will find a CD icon named Empty. Click on it, you will find the Disk icon beside the Optical Drive: SATA Port 1. Click on Choose a disk file….
Select your Windows 11 ISO file and click on Open. Then you will need to click on Start.
Install windows 11 on VirtualBox
Here you have booted Windows 11, now is the time to install it on VirtualBox.
- First you will need to select Language, Time and currency and Keyboard or Input layout for your Windows 11.
- Install now will appear, click on Install now.
- You will be asked for Product key; click on I don’t have a product key.
- Select the edition of your Windows 11 and click on Next.
- Which type of installation do you want? window will appear. There is Upgrade: Install Windows and keep files, settings, and applications or Custom: Install Windows only (advanced) option. Select the second option.
- Windows will place you for disk selection. Click on the disk and click on Next.
- Installation of Windows 11 will take place. while installing, the VM will reboot several times.
Here you have successfully installed Windows 11; from now on, you will need to customize your Windows 11.

Is this right country or region? will appear, select your country and click on Yes.
Is this the right keyboard layout or input method? will appear, select the layout and click on Yes.
Want to add a second keyboard layout? will appear, click on Skip.
How would you like to set up this device?
- Set up for personal use
- set up for work or school?

Choose the second option and then log in to your Microsoft Account.
Create a Pin, and in Windows Privacy Setting, click on Next.
Here you will see Customize your experience; you can either click on Skip or select the options then click on Accept.
Install VirutalBox guest Additions on
When you have successfully installed Windows 11 then you will Install VirtualBox guest Additions for more features. Here is how to do it:
Turn ON your VM (if it is OFF) and click on Device at the top of the menu bar. Click on Insert Guest Additions CD Images.
Now open This PC and select the CD icon which is named VirtualBox Guest Additions. File Explorer will place you to another window, navigate and find VBox Windows Additions, and double click on it.
Restart your system again.
Enable drag and drop with Clipboard
To enable drag and drop options between host and guest OS, use this method:
Go to the VirtualBox menu bar (at the top). There you will find Devices > Drag and Drop > Bidirectional.


I blog frequently and I truly thank you for your content. Your article has truly peaked my interest. I’m going to take a note of your site and keep checking for new details about once a week. I opted in for your RSS feed as well.
windows 11