Best Ways to Fix VirtualBox 0x80004005
Users who have experienced error code 0x80004005 on VirtualBox are here I will help them to fix the issue. Basically, VirtualBox displays the “E_FAIL (0x80004005)” error code while opening any VM on VirtualBox.

Normally the error appears when it can’t open a virtual machine session. The error could be due to problems with the VirtualBox itself, configuration files, or hardware-related issues. While there are different reasons the error appears on your screen, you can also use the methods given to fix it.
Fix E_FAIL 0x80004005 on VirtualBox

Here are the methods to fix E_FAIL (0x80004005) on VirtualBox. But first, please check if you have enabled Virtualization from BIOS. As some users have experienced the issue due to this option being disabled.
1- Update VirtualBox
Here is how to update your VirtualBox.

- Visit the official VirtualBox website using a web browser.
- Navigate to the Downloads section of the website.
- Find the latest version of VirtualBox for your operating system (e.g., Windows, macOS, Linux).
- Click on the download link for the appropriate version. Once the download is complete, locate the downloaded installer file on your computer.
- Double-click on the installer file to start the installation process. Follow the on-screen instructions provided by the installer to update VirtualBox.
- During the installation, you may be prompted to close any running VirtualBox instances or restart your computer. Follow the instructions accordingly
Once the installation is complete, you should have the latest version of VirtualBox installed on your computer.
2- Restart or Disable Hyper-V
Sometimes Hyper-V might get engaged and cause the error. By restarting the Hyper-V, you will fix the issue. To restart the Windows Hypervisor (Hyper-V), you can follow these steps:
- Open the Start menu and search for Control Panel.
- Open Control Panel and inside click on the Programs category.
- Under Programs and Features, click on the Turn Windows features on or off link.
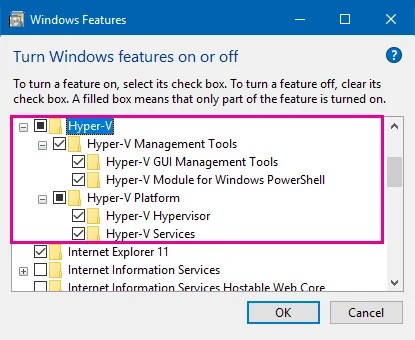
- The Windows Features dialog box will open. Scroll down and locate the Hyper-V option.
- Uncheck the box next to it. Click on the OK button to save the changes.
Windows will apply the changes and may prompt you to restart your computer. If prompted, choose to restart your computer to complete the process. After your computer restarts, follow the steps again to open the Windows Features dialog box.
- This time, check the box next to Hyper-V to enable it again.
- Click on the OK button to save the changes.
Windows will apply the changes and may prompt you to restart your computer. If prompted, choose to restart your computer to complete the process. After the restart, you will probably fix the VirtualBox 0x80004005 issue. If not, you are recommended to disable Hyper-V totally and check for issues.
If disabling Hyper-V has not fixed the issue then you will apply the next method.
3- Discard Save State of the VM
“Discard Saved State” refers to an option in virtualization software like VirtualBox that allows you to discard the saved state of a virtual machine. The saved state refers to a snapshot or a previously saved state of the virtual machine, which includes the virtual machine’s memory, disk, and system state at the time it was saved.
When you choose to “Discard Saved State,” it means that you want to discard the current saved state and start the virtual machine from a fresh state. This action will remove any changes or modifications made since the last saved state and restore the virtual machine to the point where the saved state was taken.
To discard the saved state in VirtualBox, you can follow these steps:
- Open VirtualBox and select the virtual machine for which you want to discard the saved state.
- Ensure the virtual machine is powered off.
- In the VirtualBox menu, go to the Machine option.

- From the drop-down menu, select Discard Saved State.
- VirtualBox will prompt you to confirm the action. If you are sure you want to discard the saved state, click OK or Yes.
VirtualBox will discard the saved state and start the virtual machine from a fresh state.
NOTE: Please note that discarding the saved state is irreversible, and any unsaved data or changes made since the last saved state will be lost. Make sure to save any important work before choosing to discard the saved state.
4- Rename VM XML File
To rename a VirtualBox VM XML file, you can follow these steps:
1. Make sure VirtualBox is closed completely.
2. Locate the directory where the VirtualBox VM XML files are stored. The default location is usually the VirtualBox configuration directory, which varies depending on the operating system:
– Windows: The default location is often “C:\Users\YourUserName\.VirtualBox\”.
– macOS: The default location is typically “/Users/YourUserName/.VirtualBox/”.
– Linux: The default location is commonly “/home/YourUserName/.VirtualBox/”.
3. Inside this directory, you will find:
- VM_NAME.xml-prev
- VM_NAME.xml-tmp
E_FAIL (0x80004005) error occurs, as VirtualBox simply just couldn’t find “VM_NAME.xml” at all. As this file technically doesn’t exist.
To fix the problem, you just need to make a copy of the “VM_NAME.xml-prev” file and rename the copy to “VM_NAME.xml”. Then, you will restart VirtualBox and check for the 0x80004005 error. If you are having the issue then apply the next method.
5- Install VBoxDrv.inf Manually
If you encounter the E_FAIL (0x80004005) error when starting a VirtualBox VM then it might be due to incomplete installation of the VBoxDrv.inf driver. If the driver is not installed automatically then you can manually install it. Here is how to do it:
1. Open File Explorer and navigate to the VirtualBox installation folder. By default, it should be located at:
C:\Program Files\Oracle\VirtualBox\drivers\vboxdrv2. In the vboxdrv folder, locate the file named VBoxDrv.inf.
3. Right-click on the VBoxDrv.inf file and select Install.
4. Windows will start the driver installation process.
– If prompted for confirmation, click “Yes” or “Allow” to proceed.
– Follow any on-screen instructions provided by Windows during the installation process.
Once the installation is complete, you should see a message indicating the successful installation of the VBoxDrv.inf driver. You can now try launching your VirtualBox VM again, and it should start without the E_FAIL error.
This manual installation of the VBoxDrv.inf driver resolves the issue caused by incomplete installation and ensures the smooth operation of VirtualBox.
6- Reinstall VirtualBox
If nothing works then the last option to fix the issue is to reinstall VirtualBox. Here’s how to reinstall VirtualBox:
- Ensure that VirtualBox is closed completely.
- Open the Control Panel on your Windows & navigate to Programs or Programs and Features.
- Find Oracle VM VirtualBox in the list of installed programs. Select it and click on the Uninstall or Change button.
Follow the prompts to uninstall VirtualBox from your system. Once the uninstallation is complete, restart your computer. After restarting, download the latest version of VirtualBox.
Run the downloaded installer and follow the on-screen instructions.
Complete the installation process, ensuring that you select any desired options or components. Once the installation is finished, restart your computer again.


