How to Enable Virtualization on Windows 11?
Want to enable the virtualization on Windows 11 or Windows 10? Well by enabling the Virtualization feature will provide you tons of features that include improved performance with BlueStacks, low chances of low FPS, higher support for graphics, and much more.
I have posted earlier on “how to enable virtualization from BIOS”. There is no absolute difference in enabling the virtualization feature between Windows 11, Windows 10, Windows 7, or even with macOS or Linux. As for enabling the feature, you will access the BIOS which is not dependent on your OS.
So, whether you are installing Windows 11 or any other OS, the enabling of Virtualization is the same.
Related: How to Fix BlueStacks Error on Hyper-V?
How Enable Virtualization on Windows 11 or Windows 10?

If you are still interested in “how to Enable Virtualization on Windows 11”, then you can use the method below. Before you start the procedure, let’s make sure you haven’t enabled the feature. If you have already enabled, it then you won’t need to go through those steps.
How to check virtualization enabled on Windows 11 or Windows 10?
For checking the feature, you can use either Task Manager or CMD (command prompt). Here is how to use CMD for checking the feature.
You will click CTRL+ALT+DELETE keys on your keyboard and Task Manager will appear. Then you will click on the Performance section on the top.

After opening the Performance, you will scroll down and find the “Virtualization”. now, if you found “Enabled” beside the Virtualization then it is enabled; else you will need to enable it.
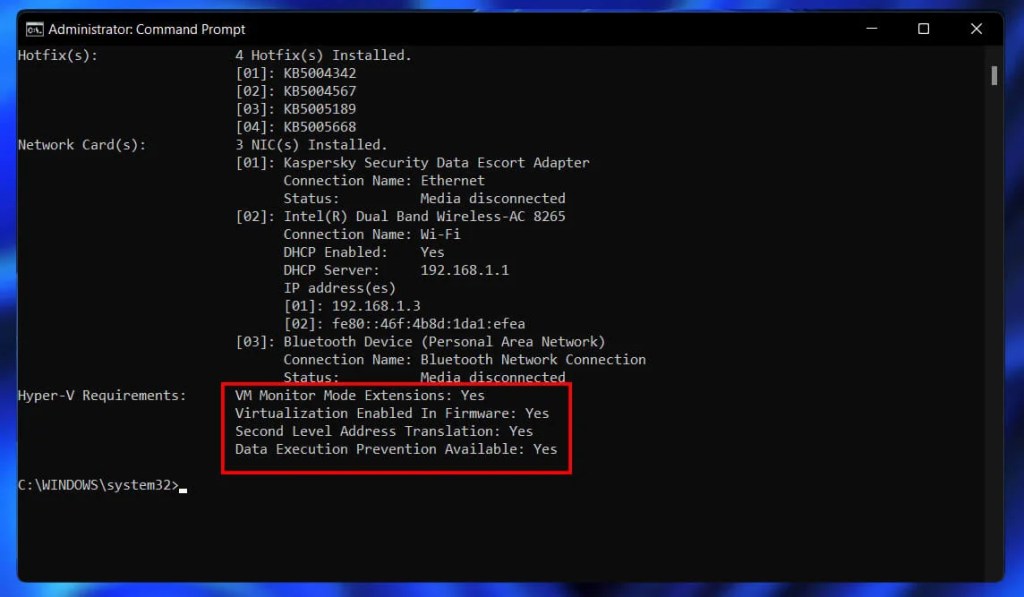
You can also use CMD as an administrator to check the feature. In CMD, you will type “systeminfo” which brings all the system information to your screen. Right at the bottom, you will find:
- VM Monitor Mode Extensions: YES
- Virtualization Enabled In Firmware: YES
- Second Level Address Translation: YES
- Data Execution Prevention Available: YES
Here YES means, you have enabled the virtualization.
Enable Virtualization on Windows
If you are using Windows 11 then you will start the procedure by going to Settings.
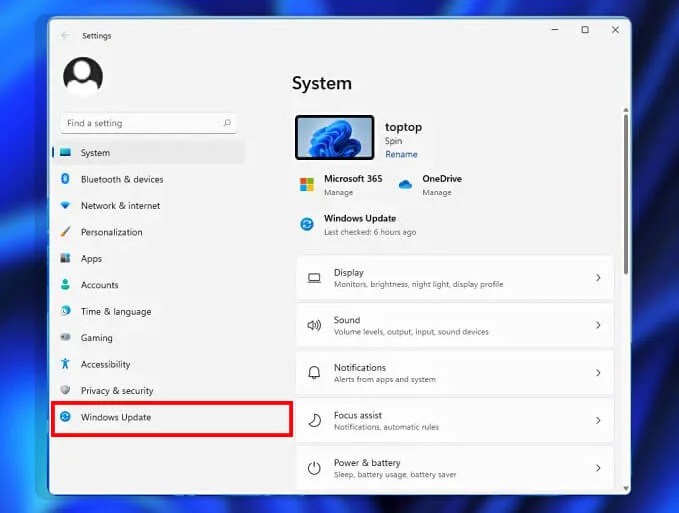
In Settings, you will find Windows Update on the left side of your screen. Select Windows Update and you will be navigated to the Windows Update window.
In Windows Update, you will find Advanced options. Click on it and you are in Advanced options.
Now click on Recovery which is in the Additional options section. Soon you will be placed in Recovery. Select the Restart now in Advanced startup.

In Choose an option, select the Troubleshoot option.

Again select the Advanced options in Troubleshoot. Then in Advanced options, you will select the UEFI Firmware option.
Note: Remember that you will find the Fast Startup instead of the UEFI Firmware option due to changes in machine types. Both of the features are the same, you will need to select the option.
Now in UEFI Firmware Settings, you will click on Restart. Your system will restart and you are in BIOS. Here you will change the settings of Virtualization to enabled. Since the machines are different, so is the features name or way to enable them. To provide you the option on how to do it on different machines here is how: How to Enable VT-x or AMD-v in BIOS or UEFI Firmware


