How to Create Bootable USB of macOS Mojave on Windows with TransMac?
Windows and Mac, both are great in terms of design, performance, and stability. Even though both of them uses the different File system, still it seems that we can’t create a bootable USB of macOS Mojave on Windows.
Nor we are able to create bootable USB on Windows or Mac directly. One way or another, it is obligatory to use third-party applications.
Even macOS users will need to use Terminal or other applications for creating a bootable USB. Users who are using Windows know this well that they can create any sort of bootable USB on Windows.
In Windows, there is CMD and PowerShell. Both of them are powerful tools still, but you are unable to create a bootable USB using these two apps. So, what if you want to create a bootable USB of macOS Mojave on Windows?
To create one, you are going to use this method given. With this method, you won’t even need to type a single line of command, all of the work will be done with GUI. Once the USB is fully bootable then you can use it on macOS with ease.
So, enough talk, and let’s dive into creating bootable USB for macOS Mojave on Windows with TransMac, I hope it will be helpful for you.
Required Files for bootable USB on Windows
Here are some of the files that you will need for your bootable USB.
- macOS Mojave Dmg File: The first thing required is to download macOS Mojave in DMG file format. If you have used a macOS, then you know that you can’t download macOS Mojave except the app store. Unlike this, you can use the direct link by using to download even on Windows. Windows users can download the macOS Mojave dmg file and use it for a bootable USB.
- Transmac: TransMac is a software that is specifically built for windows users to mount, format, edit, and create bootable USB. However, there is also alternative software to TransMac but they are working best for the Hackintosh file system (HFS). Since macOS High Sierra and macOS Mojave have an Apple File system (APS), they can’t support it.
- 16 GB USB Pen Drive: The macOS Mojave dmg file size is actually 6.7 GB and at least it requires 8 GB of storage to extract the files. But since many users are facing errors, I would recommend you use a 16 GB USB pen drive. And please make sure that the USB must be 3.0 because with USB 3.0 it takes around 50 minutes to create a bootable USB and I wonder how much time it would take for USB 2.0 to Create a bootable USB.
NOTE: Keep in mind, if you visit any site and downloaded macOS Mojave in ISO file, then most likely the pen drive won’t be bootable. As most of the providers of macOS are providing the ISO file by converting the DMG files.
They will download the macOS Mojave in the DMG file then with third-party applications such as Power ISO, DMG will be converted to an ISO file. It requires some expertise to change DMG to ISO and it is rare for anyone to put much effort.
How to Create Bootable USB for macOS Mojave on Windows?

Before creating a bootable USB for macOS Mojave in Windows 10 using TransMac, you have to download and Install TransMac first.
Installing TransMac is so simple and it does not require too much work. Just in case you don’t know how to install one on your Windows, follow the steps given below:
- Double click on the setup to launch the installation wizard.
- Click on Next, Next, Next again, and again Next.
- Now click on the Install to copy the TransMac Files to your root drive.
- When the installation got completed then click on Finish.
Step 1. Now insert your USB Pen Drive into the Computer.
Step 2. Run TransMac as Administrator. Right-click on the app and select Run as administrator.
NOTE: make sure that you are running TransMac with administrator privileges, else without the administrator privileges, you won’t be able to create a bootable USB for macOS Mojave.

Step 3. Right-click on the USB and select Format Disk for mac.

Step 4. Once the disk is formatted for Mac, again right-click and select Restore with Disk Image.
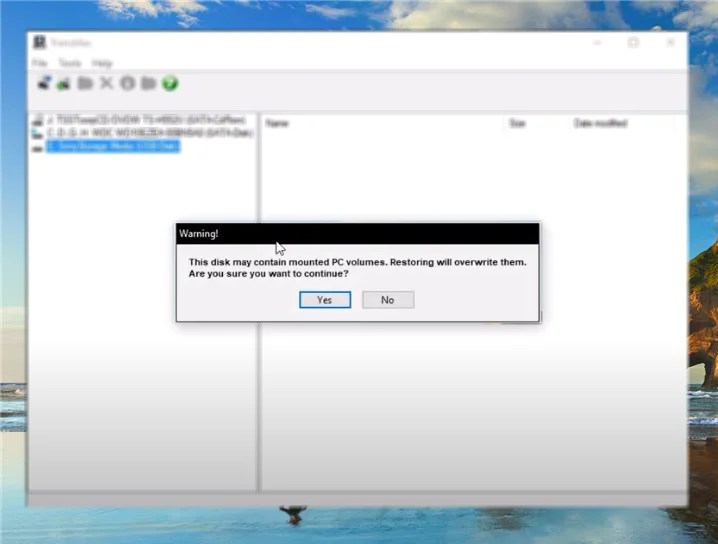
Step 5. In this step, a warning will pop up. Here you will accept the warning and continue. TransMac will warn you about the files being overwritten and accept you are going to click on Yes.

Step 6. Continue further by locating your macOS Mojave DMG file that you downloaded earlier. Click on the three dots and a new window will appear. Browse and find the downloaded DMG file and click on OK.
Step 7. Once again it will warn you, that all the files will be overwritten; click on Yes.
Step 8. Soon the copying process will take place. All the macOS files will be copied on the USB drive. Once the files are copied, you are going to remove your USB. insert the USB to a macOS and use the USB drive.
Please keep in mind that the TransMac is only compatible with creating a UEFI partition, not legacy. If you are looking to create a legacy bootable USB pen drive, then you are recommended to use UniBeast for this purpose.
UniBeast is a great alternative to TransMac. You can download UniBeast from here.
Conclusion
And that’s all with How to Create Bootable USB of macOS Mojave on Windows using TransMac. If you got any sort of question, suggestion, or encountered any issue during the process then you are recommended to comment down. This way, I will be able to help you and any other user who is experiencing the same issue.
Related: Create Bootable macOS Mojave USB Installer
Can I create a bootable USB for macOS on Windows?
If you want to create a bootable USB on Windows that can be later used on macOS then you will need to use a third-party application. Third-party application as TransMac and UniBeast are great tools to burn files on a USB.
During the process, you won’t need to type a single line of command. All the tasks are performed using the GUI.


