How to Disable or Uninstall Hyper-V on Windows?
Hyper-V is a preinstalled application on different Windows OS and Servers. There are users who love to use Hyper-V, on other hand there who don’t. If you are one of those who have enabled their Hyper-V and didn’t like it; now want to uninstall Hyper-V, then this will help.
Reasons behind disabling the application can be different errors, compatibility errors with Blue-stacks, or confusing user experience. No matter, what the problem is, you still can’t uninstall the application at all. Let me explain; Hyper-V comes preinstalled on different Windows editions like Professional, Enterprise, or Education (on Windows10).
You can only disable it; you can’t uninstall it. There is also the option to use alternatives, as VMware Workstation, Virtual Box… More About Hyper-V here.
Related: How to Fix BlueStacks Error on Hyper-V?
How to Uninstall Hyper-V on Windows?

Before we continue, if you want to check Hyper-V on your system, then you can go to Start and open RUN. Inside the RUN, type “msinfo32.exe” and press Enter. It will take you to system information, there in the Hyper-V section, you will find your Hyper-V enabled.
Here are some methods that will help you to disable/uninstall Hyper-V on Windows.
Use Control panel for disabling Hyper-V
Using the Control Panel option is the most preferred option by most of the users. For this purpose, you will go to Start > Control Panel, or you will type “appwiz.cpl” in RUN and will press Enter key.

Then you will open Turn Windows Features ON or OFF. Navigate and find the Hyper-V, uncheck the Hyper-V box, and click on OK. If you are using the new version of Windows 10 then you will also need to uncheck the Windows Hypervisor Platform too.

For changes to be made, a new pop will open with Applying changes. Then you will need to restart your system, for which another window will open as Windows completed the requested changes. You will click on Restart Now button and your system will restart.
Related: Download Hyper-V for Windows 10 for Free
CMD to Uninstall Hyper-V
CMD (command prompt) is another way for the purpose. If you want to use CLI (command line interface) instead of GUI (graphical user interface).

Run CMD as administrator and type “systeminfo” in CMD. There you will find the Hyper-V requirement section. If there is a Yes in front of your Hyper-V, then you will need to deactivate your Hyper-V by using the command below:
Disable-WindowsOptionalFeature -Online -FeatureName Microsoft-Hyper-V-AllPaste the command in CMD and press Enter key. Then you will type “Y” again to confirm the command and press Enter. loading will take place, and you have successfully completed the operation.
Remove with DISM

DISM (Deployment Image Servicing and Management) is another method of uninstalling the application from your system. however; unlike the method above, DISM works with Windows images (.wim).
For this method, you will run CMD or PowerShell as administrator then will use the command below:
DISM /Online /Disable-Feature:Microsoft-Hyper-VLoading will take place, and you have successfully uninstalled the application.
How to uninstall Hyper-V on Windows Server?
Since Windows Server has GUI (graphics user interface) to uninstall the app, then you won’t need to use any commands at all. For this purpose, you will start the Server Manager.

Then you will click on Manage in the menu. There you will find the Remove Role and Features option.
Before You Begin window will appear on your screen, you won’t need to perform any kind of configuration here. You will select Skip this page by default option to avoid further details and will click on Next.
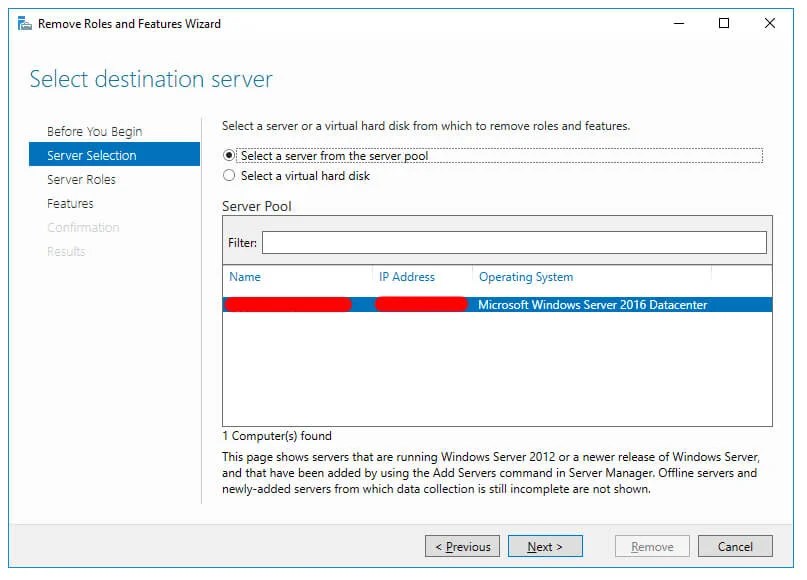
In Server Selection, you will select a server from the server pool. Select the server and click on Next.
Here in Server Roles, you will uncheck the Hyper-V; in the pop-up of Remove features that require Hyper-V? and click on Remove Features.

Again you will be placed in Remove Features window, click on Next to uninstall the application.
Confirm removal selection will appear, click on Remove to start the uninstallation of the applications.
Note: all the application that will be uninstalled that includes Hyper-V will appear on your Confirm Removal Selection window, it didn’t then you will need to go back and uncheck the application and repeat the procedure again.


